One of the essential accessories that should accompany your table saw is a fence. Once you get this equipment, it is true that it comes with a supplied fence from the manufacturers, but what is usually the case? You find out that these fences are not quality enough or not reliable enough for proper woodwork.
This can leave you stranded impromptu in the middle of construction or mini-project that you may be engaged in because the sub-standard fences do not often last long. Because of this need, we realize that you can simply solve your table saw fence problem with a simple DIY challenge.
In as quickly as an hour, you can get your table saw fence ready and fit for use. There are many types of DIY table saw fences. Each of these fences has different plans. Find the tutorials to each one below, so that you can make yours in little time.
Table of Contents
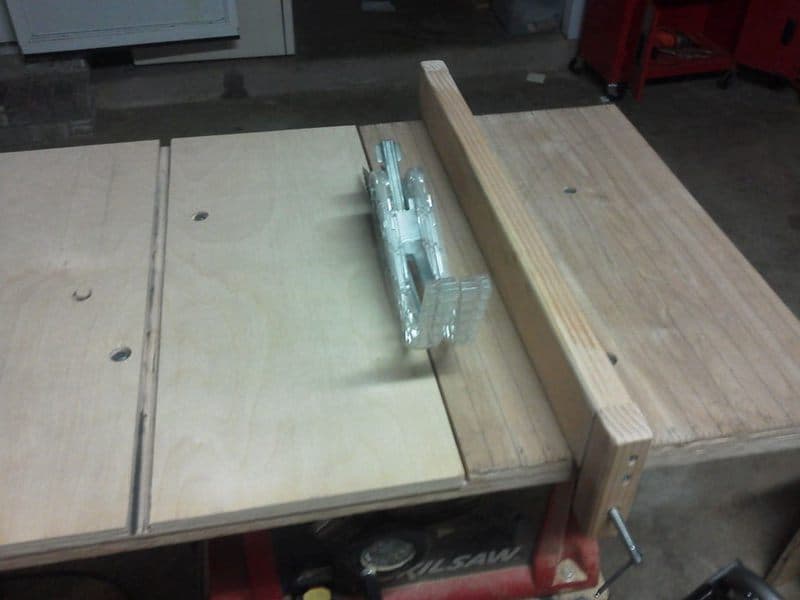
This DIY fence is so easy that it has only three steps. This written tutorial is straight to the point, easy to understand, and super-easy to make. To get a quick glimpse of what making this saw fence is like, this is what the plan entails.
First, you must make sure that your table is square and upright to fit the blade. Next is cutting the wood. For this table saw fence, we used 2 x 4 wood. The main piece of wood must be up to ½ inch longer than the table length.
Finally, this step requires merely screwing in a nut and a threaded rod to make an easy and operational locking device for your fence.
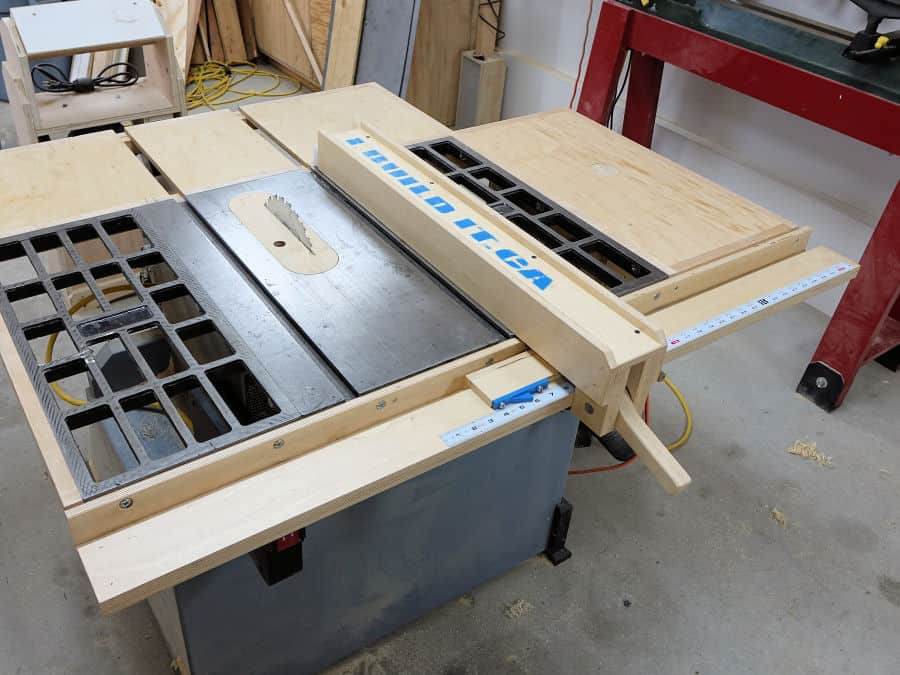
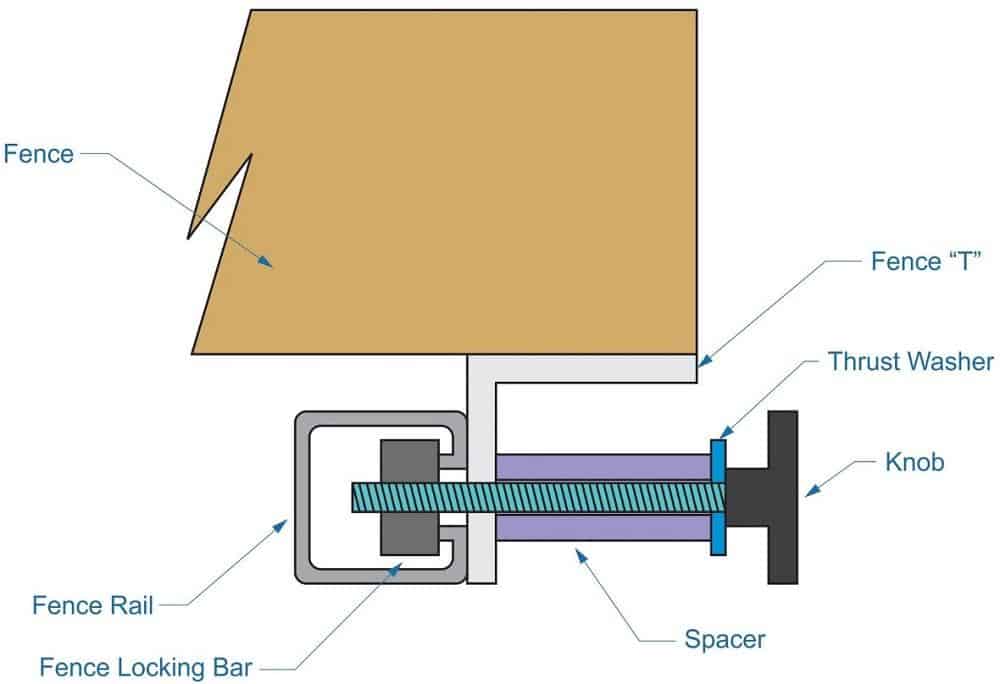
This fence is so called because it looks just like the Biesemeyer T-Square fence. However, they are not the same. They have a few differences that give this saw its uniqueness. For example, where the Biesemeyer has a lever, this table saw fence has a tightening knob that can be used to lock the fence anywhere you wish.
This table saw fence is made up of aluminium, metal, and also wood, so you would need these materials to make your table saw fence. You would also need to get ready your tools for drilling holes into all three materials and then also get tools for driving screws into them.
If you have a saw that is bigger or smaller than an 8-inch saw, you would need to adjust (increase or decrease) your fence dimensions to match your saw’s size. The plans for making this saw are straightforward and easy to understand.
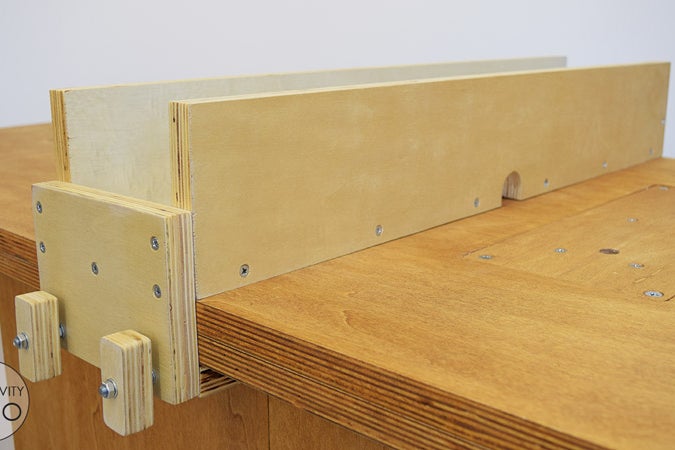
Just like the table saw fence in number 4, this table saw fence is entirely made from wood. The entirety of the fence is almost made using only one ½ inch plywood. The way this wooden table saw fence works is that it is designed to move on a rail with a tape measure, and it also comes with a wooden lever that would secure it in place wherever you wish.
See also 7 Homemade Drum Sander You Can DIY EasilyThis saw fence written tutorial is easy to understand, but you may have to find out the measurements for the length of some parts by yourself. You can do this by doing some calculations before you begin, or purchase this video tutorial to get the table saw fence construction plans.
If you are convinced about making this saw fence, here are a few of the materials you would need to prepare: A drill, wood glue, a jigsaw, and a ton of clamp. This table saw fence that entails a lot of detailed woodwork, so be prepared.
 Square DIY Metal Table Saw Fence" width="944" height="475" />
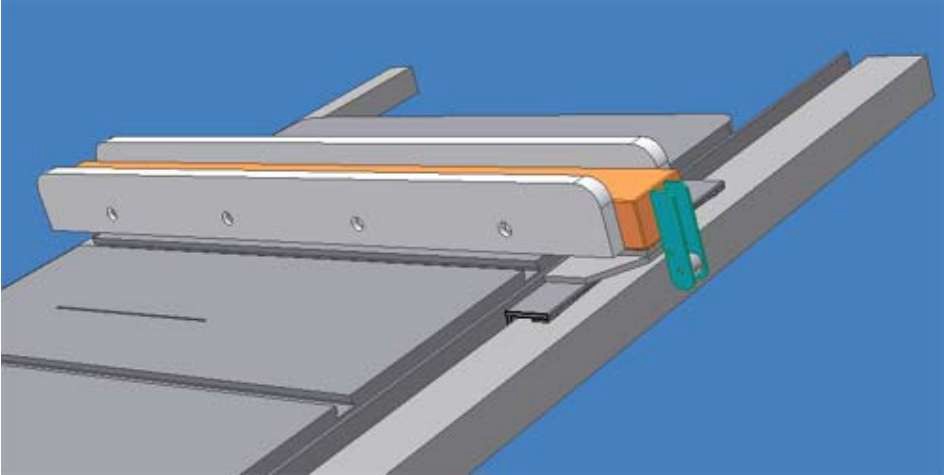
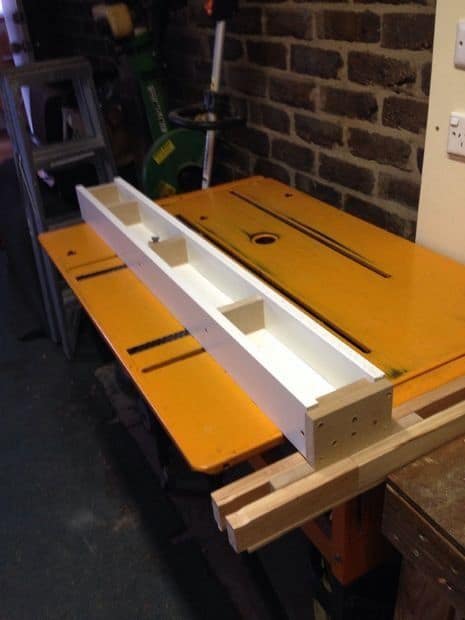
This table saw fence is typically for the European table Saw or Sliding table saw. This tutorial shows you how to make a DIY metal table saw fence. It is also like the aluminium fence, but this time, it is even more durable. It also gives your equipment a more professional look.
Making this saw fence is not as complicated as it looks. The author of this tutorial, Joe Emenaker, in his free pdf guide, clearly explains how to cut and weld the pieces of metal back together.
The majority of the parts of this fence, like the rail and clamping system, are made from metal, then the sacrificial fences are fashioned in wood and then fixed to the metal table fence.
In the tutorial guide, there is a list of materials and tools you would be needing, which includes a lot of metal. This plan is mainly metalwork, so keep that in mind, especially if you’re a rookie.
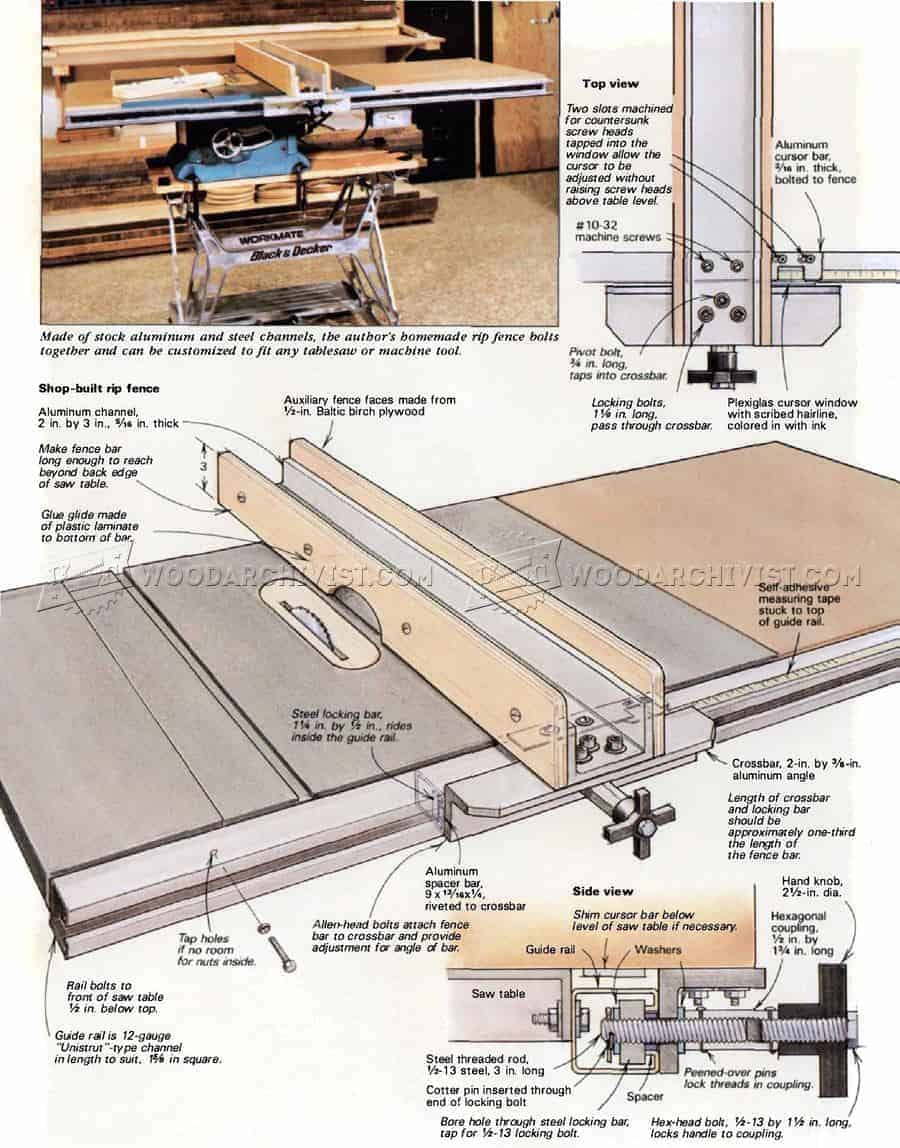
Just like the name suggests, this table saw is made of aluminium material, unlike the completely wooden ones. This is a written tutorial, although one without images that would have aided in understanding the plan.
This plan, however, favours the argument that the fence is more important than the blade of the saw itself. This is why the designer decided to go for sturdy building material to create a sturdy fence. This table has many features that ensure that your table saw has the right facility to function well.
It is a rigid fence, which means that it cannot buckle under the pressure of foreign objects wedged between your blade and the saw. It’s also easy to use and secure too. Once the saw is in place, it doesn’t move.
To make this fence, prepare your aluminium, wood, drills, and other items you would find in the tutorial.
This is another simple, fast, and low budget tutorial that you can get over within no time. It requires simple and readily available tools like plywood, screws, and glue. This is a picture-filled tutorial that captivatingly covers all you need to do to build the perfect table saw fence. If you would prefer a video version, it also includes one at the end.
See also 8 DIY Sandblaster Ideas You Can Diy EasilyThis table saw fence has one of the superior locking mechanisms, which makes it unique. You don’t need other materials like aluminium or metal for this fence; your plywood would do an excellent job alone. The locking feature is also made from plywood.
To further complete its simplicity, the plywood lock is made up of a hook (which is kept in place by a rubber band) and a tightening knob, also made from plywood.
This written tutorial gives a detailed explanation of why and how you should use a table saw. It also describes what a table saw fence is. Going further, it precisely explains how to make one.
In this tutorial, it dishes out details such as items, tools, and materials needed for the project. For this DIY saw fence, you would need a Jigsaw, tape measure, screws, threaded rod, and nut. The plan also shows and suggests possible dimensions necessary for the construction.
Lastly, the tutorial gives excellent advice on how, when to upgrade your saw fence to a more professional one as time passes.
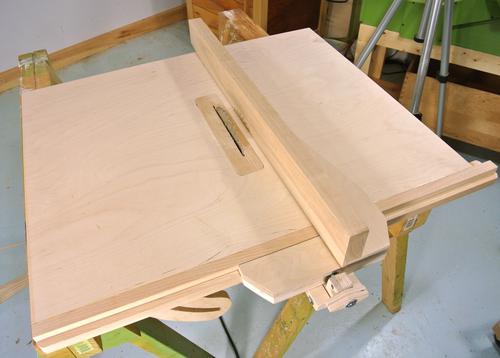
This table saw fence was born out of the need to create a fence that keeps the rip fence aligned to the blade. According to the author, it was time-consuming and a major limitation. She then came up with this unique sliding T-Square table saw fence.
This is a picture tutorial made up of six easy steps. You would need melamine board, scrap timber, drills, a metal ruler, wood screws, T-nuts, and some bolts. One key feature of this table saw fence is that it is not only cheap to make; it is very durable and long-lasting.
This table saw fence got its name from Elias Stratako, the first to create any of its kind, and he crowned it “the easiest, strongest, steadiest, and fully functional homemade table saw fence you will ever come across.”
Just like many table saw fences, this one is also almost entirely made from wood, but in a witty and smart design. The smartest feature of his plan is the way the lever-locks (lever-locking system). The locking system comes with a round handle and a round piece of wood.
The video tutorial, which also comes with a written version that has clear pictures, is very detailed and entertaining. Above all, it shows you how to get the saw done in a jiffy with some captivating woodworking styles.
To follow this tutorial accurately (if you don’t already have them), get yourself a metal drill, framing nailer, a drill, and a cut-off tool.
This table saw fence is different from the others, in that it is a DIY table saw fence for a homemade table saw. For this project, you would need aluminium, screws, T nuts, plywood, drills, hammers, table or hand saw, and some others.
The easy to grasp video tutorial has all you would need to build your table saw fence for your homemade table saw. It is made up of 8 quick steps that work you through the creation process.
See also 13 DIY Laser Engraver Kit Projects: Do It Yourself TodayIts minimal and straightforward design is a must-have for your table saw.
Building this fence yourself will save you a lot of money, and also give you a challenging project to try your hands at. It will not only get you a high-quality table saw; you will do so little cost. This saw fence is also great for any model, including mini table saws, or contractor table saws.
The plan for this money-saving table saw fence is in the form of a video tutorial, which is very detailed and explanatory. Putting this fence together is not difficult. Most of the parts you would build are made with uncomplicated square cuts on your table saw. It also does not need any difficult skills to put the pieces together.
For this saw fence, you would need a few materials such as a drill, plywood, ½ inch thick plywood, screws, and wood glue.
This one is an easy to make table saw fence, and it is made from wood only. This feature makes it unique and beautiful to look at. It resembles a T-styled wall resting on a wooden rail in front of the table close to the edge.
This tutorial has a video lesson with clear images that does justice to the explanations. For this fence, you would need tools such as clamps, screwdrivers, glue, a drill, and a mallet.
Before you begin work, you must remember that this table saw fence is made entirely from wood and may not be suitable for table saws made with some specific types of materials, for example, steel.
One of the good things about this table saw fence is that it doesn’t allow for sawdust and debris to get caught anywhere. It’s also not bulky, and it’s easy to use.
Based on the plan of this fence, it’s easy to see that the designer aims at creating a double-sided table saw fence that you can use on either side of your saw. This provides flexibility in working than most saw fences would.
One other exciting quality of this table saw fence is that it fixes a hardwood over the edge of the fence, on the flip side of the table, to help prevent your fence from jostling around. You would need a pocket hole jig, a table saw, a drill, and a nail gun.
This video tutorial is quite detailed and informative, and so is the accompanying written version. The tips would guide you through quickly.
The table saw fence is almost as important as the table saw itself. That’s why choosing the right table saw fence might seem like a daunting task. Thankfully, each of the DIY table saw fences above has a detailed tutorial embedded within. You can go through them and pick the best fit for you depending on the type of table saw you own and soon after, you can get to constructing!